السلام عليكم ورحمة الله وبركاته
.png)
لربط ال Google Analytics مع الBlogger
أتبع الخطوات التالية:
نبذة بسيطة عن الGoogle Analytics:
Google Analytics أحد منتجات شركة Google , من مميزات شركة Google عند عمل حساب Google فأن هذا الحساب سوف يكون مخول للدخول لكل منتجاتهم!
المهم, الحاجة الأساسية للGoogle Analytics هي معرفة وبالتفاصيل الدقيقة عن زوار موقعك او تطبيقك, مثل: من هم الزوار الذي هم موجودين في الوقت الحالي عن طريق خاصية ال Real-Time, ومن اين ؟ وماهي الأجهزة التي يستخدموها؟ وغيرها من التفاصيل الأخرى ...
لأجل ربط الGoogle Analytics مع الBlogger اتبع الخطوات التالية:
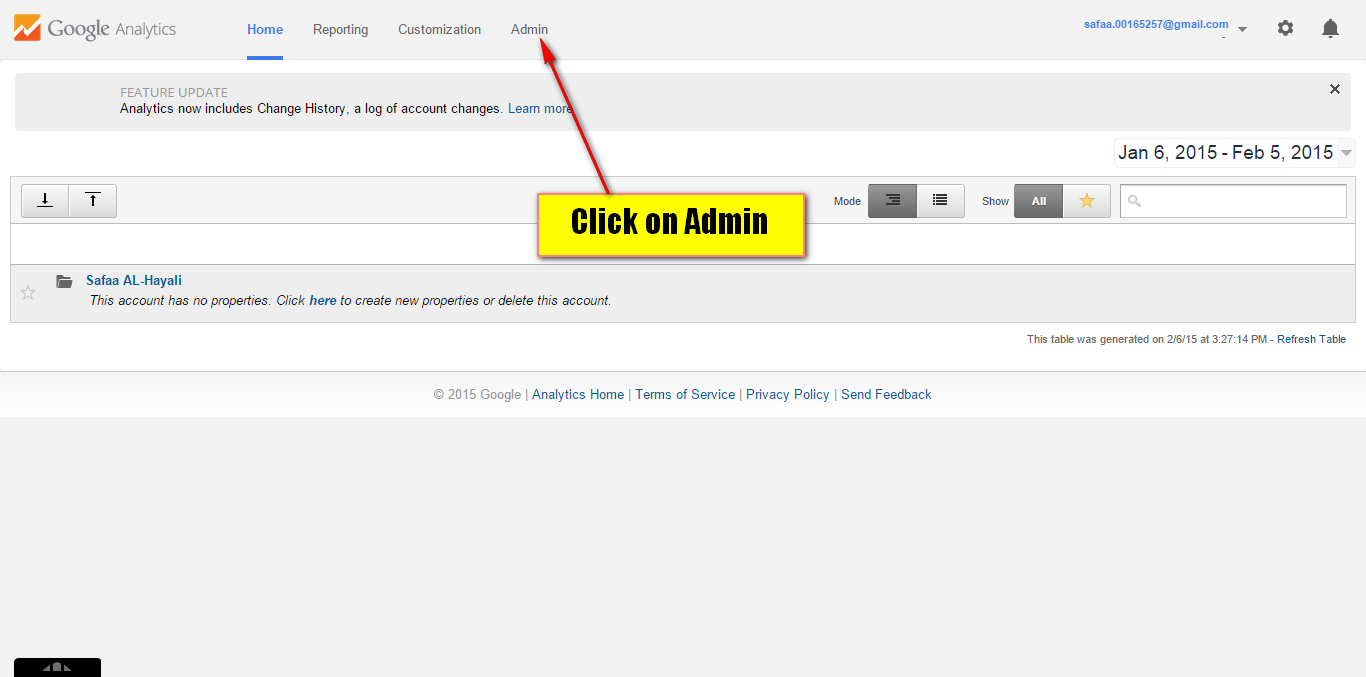
الخطوة الأولى: اذهب الى ال Google Analytics وأضغط على Admin:
Step #1: you have to go to Google Analytics then click on Admin link:
الخطوة الثانية : أضغط على Select property ومن ثم أضغط على Create new property لأنشاء ملكية موقع او تطبيق:
Step #2: Click on select property then click on create new property:

الخطوة الثالثة : قم بأختيار هل الTracking ID سيكون للموقع او للتطبيق سأختار للموقع ومن ثم سأحدد اسم موقعي وعنوان موقعي وتصنيف الموقع والوقت المحلي للبلد الساكن فيه
وبعد ذلك أضغط على Get Tracking ID
Step #3: Fill out all the basic information like do you want to make the Google Analytics for website or mobile app? then enter website name with it's URL and the industry category and specify the Time Zone after that click on Get Tracking ID:

الخطوة الرابعة : قم بنسخ الكود في اي صفحة تريد تتبعها ومعلومات الزائر فيها , ولكن لأجل الBlogger سأقوم بنسخ الTracking ID فقط!!!
Step #4: Copy the code below into any web page you want to keep track the visitor for it, but since I'm using Blogger it's quite simple just I'll copy the Tracking ID:

الخطوة الخامسة : سأذهب الى الBlogger Admin panel ومن ثمة Settings --> Other وفي خانة الGoogle Analytics سألصق الTracking ID:
Step #5: I'll navigate to Blogger Admin Panel then click on Settings --> Other and in Google Analytics text box insert the Tracking ID:

الخطوة السادسة : عدد زواري قليلين ؟!!! :(
:( Step #6: The number of my visitors very small

شكراً لزيارتكم
ولا تنسوا ان تعملوا مشاركة للموضوع , وعمل اعجاب اذا كان الموضوع له اهمية بنظرك ولتواصل عملي في كل ماهو ضروري!!!
دمتم في رعاية الله
Comments
Post a Comment